Lets imagine you are building a custom checkout flow or adding custom functionality that will integrate an ERP system to order processing flow. In order to achieve the business logic it is likely you will need to introduce a new order state and status.
In Magento 2 store admins are able to create order statuses by going to Stores->Order Status->Create New Status. They can also associate the newly created statuses with any of the available order states. You can browser the official user guide for more details.
TIP. How order state differs from order status. Order status is meant for store users to understand and control the order workflow. Order state is meant for Magento system to understand and process the order workflow. You can assign multiple statuses to each state, however each status can have only one state.
So we could create a new order status using built in admin functionality. However the state can not be created from admin. In order to add a new state you will have to create it. The script we will show below can be used with already existing states as well.
First you will need to create a new module. We assume you are already familiar with this. We will name our module Techflarestudio_OrderData. This is where all of the custom code will go.
In order to create an order attribute you will need to create a data patch which will use the status factory to instantiate and create the new status.
<?php
/*
 *  @category	Techflarestudio
 *  @author		Wasalu Duckworth <[email protected]>
 *  @copyright  Copyright (c) 2021 Techflarestudio, Ltd. 			(https://techflarestudio.com)
 *  @license	http://opensource.org/licenses/OSL-3.0 The Open Software License 3.0 (OSL-3.0)
 *
 */

namespace Techflarestudio\OrderData\Setup\Patch\Data;

use Magento\Framework\Setup\Patch\DataPatchInterface;
use Magento\Framework\Setup\ModuleDataSetupInterface;
use Magento\Sales\Model\Order\StatusFactory;
use Magento\Sales\Model\ResourceModel\Order\StatusFactory as StatusResourceFactory;

/**
 * Class AddReceivedOrderStatus
 * @package Techflarestudio\Content\Setup\Patch\Data
 */
class AddReceivedOrderStatus implements DataPatchInterface
{
    const STATUS_CODE = 'received';
    const STATUS_STATE = 'received';

    /**
     * @var ModuleDataSetupInterface
     */
    private $moduleDataSetup;

    /**
     * @var StatusFactory
     */
    protected $statusFactory;

    /**
     * @var StatusResourceFactory
     */
    protected $statusResourceFactory;

    /**
     * @param ModuleDataSetupInterface $moduleDataSetup
     * @param StatusFactory $statusFactory
     * @param StatusResourceFactory $statusResourceFactory
     */
    public function __construct(
        ModuleDataSetupInterface $moduleDataSetup,
        StatusFactory $statusFactory,
        StatusResourceFactory $statusResourceFactory
    ) {
        $this->moduleDataSetup = $moduleDataSetup;
        $this->statusFactory = $statusFactory;
        $this->statusResourceFactory = $statusResourceFactory;
    }

    /**
     * @inheritdoc
     */
    public function apply()
    {
        $status = $this->statusFactory->create();

        $status->setData([
            'status' => self::STATUS_CODE,
            'label' => 'Received',
        ]);

        /**
         * Save the new status
         */
        $statusResource = $this->statusResourceFactory->create();
        $statusResource->save($status);

        /**
         * Assign status to state
         */
        $status->assignState(self::STATUS_STATE, true, true);

        return $this;
    }

    /**
     * @inheritdoc
     */
    public static function getDependencies()
    {
        return [];
    }

    /**
     * @inheritdoc
     */
    public function getAliases()
    {
        return [];
    }
}
First thing you will notice that we are using the status object using default factory however saving it using resource factory. This is because the models should not be responsible for saving the data, that is the job of resource models. It would be nice to use an abstraction here however there are no service contracts for this functionality.
Other than that the script is fairly simple - we initiate the object set our custom status code and label, save it.
Another important thing to note is how we are setting a custom state by assigning it to the status.
By default there are 10 states in Magento 2.4. You can find the available states in sales_order_status_state table. Here is the list:
MySQL [magento]> select * from sales_order_status_state;
+-----------------+-----------------+------------+------------------+
| status          | state           | is_default | visible_on_front |
+-----------------+-----------------+------------+------------------+
| canceled        | canceled        |          1 |                1 |
| closed          | closed          |          1 |                1 |
| complete        | complete        |          1 |                1 |
| fraud           | payment_review  |          0 |                1 |
| fraud           | processing      |          0 |                1 |
| holded          | holded          |          1 |                1 |
| payment_review  | payment_review  |          1 |                1 |
| pending         | new             |          1 |                1 |
| pending_payment | pending_payment |          1 |                0 |
| processing      | processing      |          1 |                1 |
+-----------------+-----------------+------------+------------------+
10 rows in set (0.001 sec)
After assigning the state using the following our new state received is added to this table automatically.
$status->assignState(self::STATUS_STATE, true, true);
That is it. After completing the steps make sure to enable your module, run setup upgrade and you should be able to see the new status in admin order status list as well as use the new state in custom order processing logic.

To recap - we have added new order status and new order state using a data patch. This can come in handy if you need to work on a feature which will introduce new order processing logic.
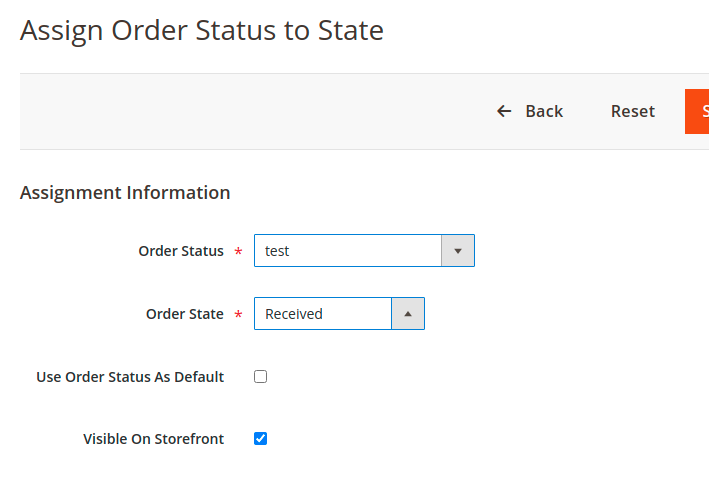
Additional TIP
Once the new state is created you will be able to assign other status to it. Here is an example on trying to assign new status test to our newly created Received