
In this article we will work a bit on Magento 2 checkout and create a new feature - adding a comment box in shipping sections. The use case is very simple - often times merchants want to allow customers to enter comments regarding their shipping choice. In native Magento this is not possible. This will likely turn out to be a series of tutorials. We will start at the very base - getting the component to render and set the structure for being able to process the data later on. Let's get started.
First you will need to create a module. I assume you are familiar with that because if you are not you will likely not be able to follow the next steps. You might want to look through our other articles before starting with this one.
TIP: A lot of Magento code can be generated using Pestle
Once you have the module created you will want to enable it and make sure you have your dev environment all set up.
Add the component
Add the component after shipping methods in checkout layout. We are going to use native shippingAdditional node which will render our component as part of the shipping step. Add the component as a child to this node:
<?xml version="1.0"?>
<page xmlns:xsi="http://www.w3.org/2001/XMLSchema-instance" xsi:noNamespaceSchemaLocation="urn:magento:framework:View/Layout/etc/page_configuration.xsd">
    <body>
        <referenceBlock name="checkout.root">
            <arguments>
                <argument name="jsLayout" xsi:type="array">
                    <item name="components" xsi:type="array">
                        <item name="checkout" xsi:type="array">
                            <item name="children" xsi:type="array">
                                <item name="steps" xsi:type="array">
                                    <item name="children" xsi:type="array">
                                        <item name="shipping-step" xsi:type="array">
                                            <item name="children" xsi:type="array">
                                                <item name="shippingAddress" xsi:type="array">
                                                    <item name="children" xsi:type="array">
                                                        <item name="shippingAdditional" xsi:type="array">
                                                            <item name="component" xsi:type="string">uiComponent</item>
                                                            <item name="displayArea" xsi:type="string">shippingAdditional</item>
                                                            <item name="children" xsi:type="array">
                                                                <item name="comment_block" xsi:type="array">
                                                                    <item name="component" xsi:type="string">Techflarestudio_ShippingComment/js/view/checkout/shipping-comment-block</item>
                                                                </item>
                                                            </item>
                                                        </item>
                                                    </item>
                                                </item>
                                            </item>
                                        </item>
                                    </item>
                                </item>
                            </item>
                        </item>
                    </item>
                </argument>
            </arguments>
        </referenceBlock>
    </body>
</page>
Once we have the component added in layout we need to define the component class Techflarestudio_ShippingComment/js/view/checkout/shipping-comment-block.
define([
    'jquery',
    'ko',
    'uiComponent',
    'Magento_Checkout/js/model/quote'
], function (
    $, ko, Component, quote) {
        'use strict';
        return Component.extend({
            defaults: {
                template: 'Techflarestudio_ShippingComment/checkout/shipping-comment-block'
            },
            initObservable: function () {
                this.selectedMethod = ko.computed(function() {
                    var method = quote.shippingMethod();
                    var selectedMethod = method != null ? method.method_code : null;
                    return selectedMethod;
                }, this);

                return this;
            },
        });
    }
);
A few things to mention regarding this:
- We are defining our template file
- We are using ko.computed to define an observable value. This will automatically determine the currently selected shipping method. This is not required in order to show the block for all shipping methods. However we are adding this here in order to demonstrate how the block can be added to a set or a specific shipping method. We will use the selectedMethod() function in the template to determine if the block should be visible.
As the last step for displaying the component you need to create the template itself.
<div data-bind="visible: selectedMethod() == 'custom_free_shipping'">
    <div data-bind="mageInit: {'collapsible':{'openedState': '_active'}}">
        <div data-role="title">
            <span class="action action-toggle" role="heading" aria-level="2">
                <!-- ko i18n: 'Add a shipping comment'--><!-- /ko -->
            </span>
        </div>
        <div data-role="content">
            <form class="form form-comment">
                <div class="field">
                    <div class="control">
                        <textarea class="input-text" name="shipping_comment" rows="4" data-bind="attr:{placeholder: $t('Type here...')} " ></textarea>
                    </div>
                </div>
            </form>
        </div>
    </div>
</div>
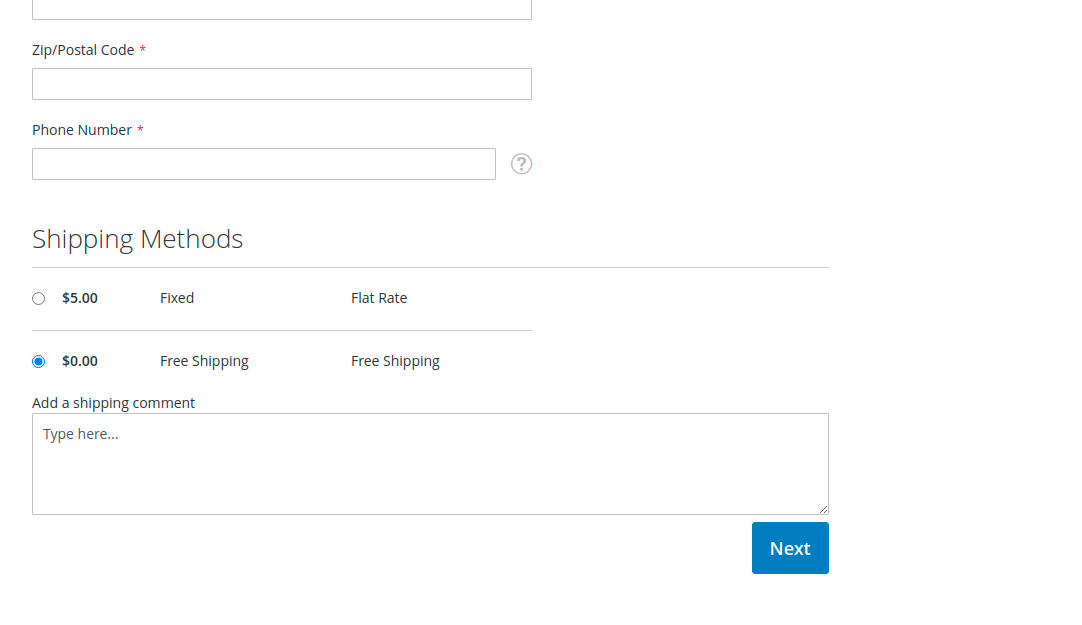
As you can see we are starting with the observable function to check if the block should be visible. We are setting this block to be visible for our custom free shipping method (take a look in this article how to create a custom shipping carrier).
We are also using a collapsible widget which allows us to toggle the comment box and by default show only the title Add a shipping comment.
The form is simple - a single textarea field that allows the user to enter the comment.
At this point if you followed along correctly you should be able to see the comment box appear below the shipping methods. If you are having issues make sure that the selected shipping method matches the computed value.
Process the data
Before we can save this data we need to create a base for passing the form values and passing them to appropriate classes. First you will need to declare a mixin for place order action. We only care about the place order action because the comment is not relevant for us before the order is placed. If you care about saving this value for abandoned carts then you may want to hook into set shipping information or similar.
var config = {
    config: {
        mixins: {
            'Magento_Checkout/js/action/place-order': {
                'Techflarestudio_ShippingComment/js/action/place-order-mixin': true
            }
        }
    }
};
Next we will create our mixin class.
define([
    'jquery',
    'mage/utils/wrapper',
    'Techflarestudio_ShippingComment/js/action/shipping-comment-processor'
], function ($, wrapper, shippingCommentProcessor) {
    'use strict';

    return function (placeOrderAction) {

        return wrapper.wrap(placeOrderAction, function (originalAction, paymentData, messageContainer) {
            shippingCommentProcessor(paymentData);

            return originalAction(paymentData, messageContainer);
        });
    };
});
The mixin is very simple - it only wraps the original method and calls our custom data processor which will handle the data. And finally create the processor which will add our comment to payment extension attributes.
define([
    'jquery'
], function ($) {
    'use strict';

    return function (paymentData) {

        if (paymentData['extension_attributes'] === undefined) {
            paymentData['extension_attributes'] = {};
        }

        paymentData['extension_attributes']['comment'] = $('[name="shipping_comment"]').val();
    };
});The processor is fetching and setting the comment value for payment extension attributes. At this point the data is not yet saved however we have the base of data processing flow and we are ready to create the backend part of this task.
That is it for this article. In the next one we will show you how to save this value to database and how to show it in admin order view. Stay tuned.
 Techflare studio